Підключення через фіди
Детальна покрокова інструкція для підключення Spefix через XML-фід товарів. Підходить для будь-якої платформи.
⏱ Час: 15-20 хвилин
Крок 1: Реєстрація
Через email
- Перейдіть на spefix.com
- Натисніть "Спробувати безкоштовно" або "Увійти" (в верхньому меню)
- Заповніть форму:
- Email — обов'язково
- Номер телефону — обов'язково (для зв'язку з менеджером)
- ПІБ — опційно
- Перевірте пошту → скопіюйте пароль → увійдіть в кабінет
Через Google
- Натисніть "Увійти через Google"
- Виберіть акаунт
- Введіть номер телефону (обов'язкове поле)
- Готово — ви в кабінеті
Крок 2: Створити домен
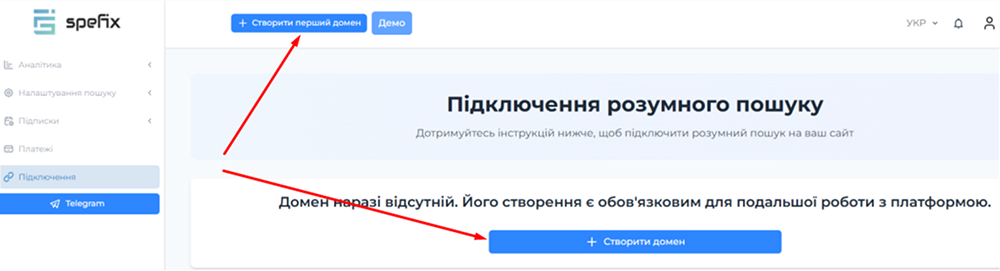
- У кабінеті знайдіть кнопку "Створити домен" (в хедері)
- У модальному вікні введіть URL вашого сайту
Приклад:https://myshop.com.ua
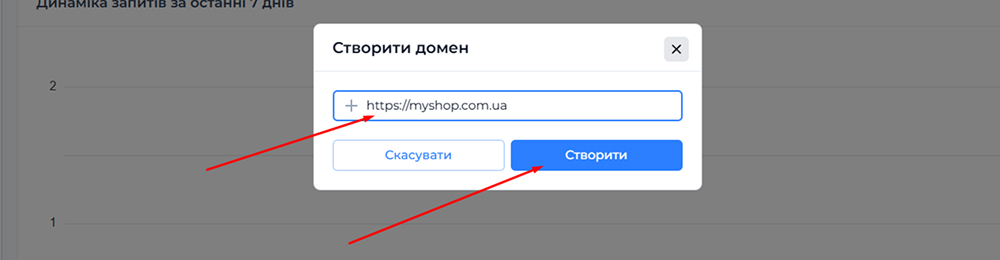
- Натисніть "Створити"
Вказуйте справжній домен сайту, на якому хочете підключити пошук. Віджет працюватиме тільки на цьому домені.
Якщо потрібно підключити пошук на кілька сайтів — створіть окремий домен для кожного.
Крок 3: Підготувати фід товарів
Spefix працює з XML-фідами товарів у двох форматах:
Варіант 1: Google Merchant Center (рекомендовано)
Якщо у вас вже є фід для Google Shopping — він підійде.
📖 Вимоги до фіду Google Merchant
Варіант 2: Формат Spefix
Можете створити фід за нашими правилами для кращої релевантності.
Зазвичай фід генерується автоматично у вашій CMS:
Налаштування → Експорт → Google Merchant / Розетка / Prom
Або не знаєте де його взяти? Зверніться до нашої підтримки — проконсультуємо і допоможемо отримати фід для вашої платформи.
💬 Telegram: @spefix_pm • 📧 [email protected]
Крок 4: Додати фід у Spefix
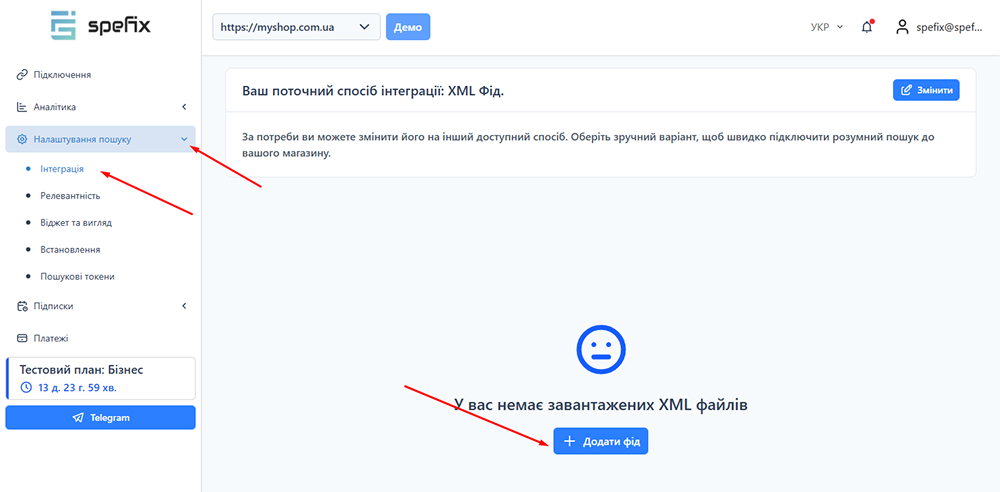
- У кабінеті перейдіть: Налаштування пошуку → Інтеграція
- Натисніть "Додати фід"
- У формі заповніть:
- URL фіду — посилання на ваш XML-файл
Приклад:https://myshop.com.ua/feed.xml - Мова фіду — виберіть зі списку (українська, російська...)
- URL фіду — посилання на ваш XML-файл
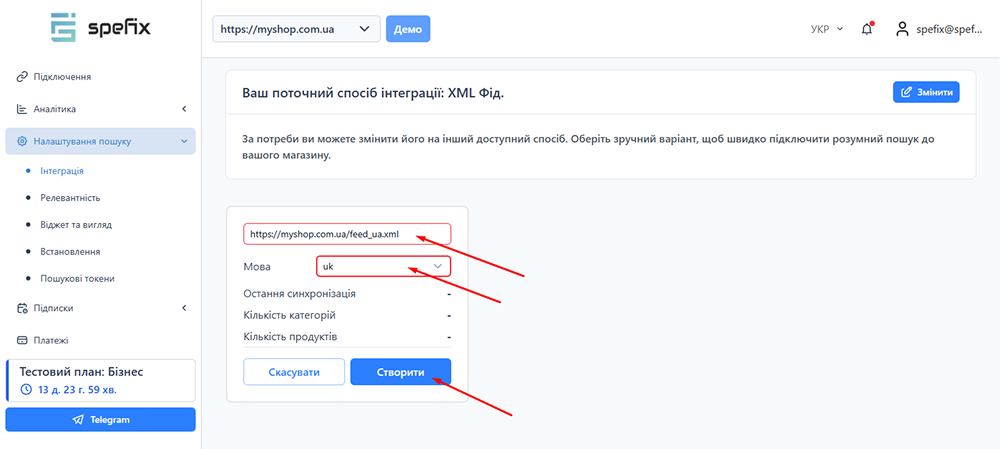
- Натисніть "Створити"
Вказуйте справжнє посилання на фід, яке генерує ваша CMS. Не просто додавайте /feed.xml до домену — це не спрацює.
Фід має бути доступний за посиланням і містити XML-дані ваших товарів.
Немає вашої мови в списку? Або фід не додається через помилку?
Зверніться до підтримки — додамо мову індивідуально та допоможемо розібратись з помилками фіду.
💬 Telegram: @spefix_pm • 📧 [email protected]
Крок 5: Дочекатись завантаження
Після додавання фід почне завантажуватись та індексуватись.
Статус можна побачити в розділі Інтеграція:
- Опрацювання — фід завантажується (5-15 хв для великих каталогів)
- Готово — можна тестувати пошук
- Помилка — зверніться до менеджера
Перевірити роботу пошуку
Коли фід завантажено, у профілі з'явиться кнопка "Демо" — можете протестувати пошук по вашим товарам прямо в кабінеті.
Якщо фід не додається — зверніться до менеджера в Telegram або через чат. Допоможемо розібратись.
Крок 6: Встановити код на сайт
- Перейдіть у розділ "Підключення"
- Скопіюйте код віджету з вашого кабінету:
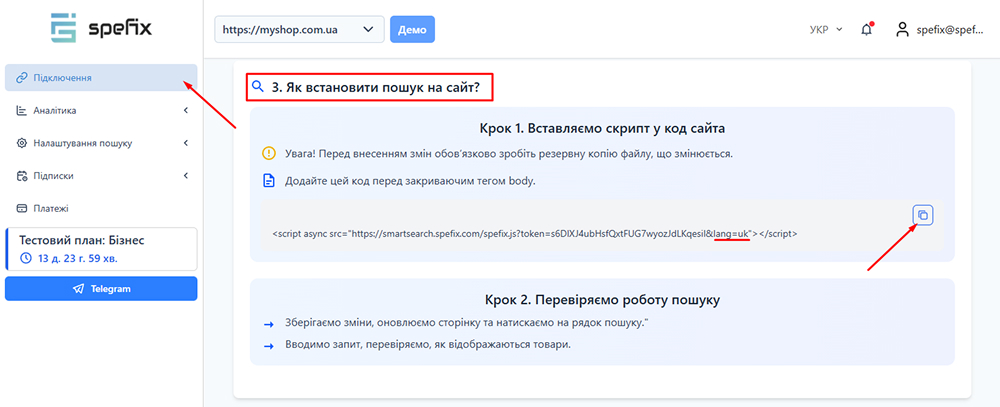
<script async src="https://smartsearch.spefix.com/spefix.js?token=YOUR_TOKEN&lang=uk"></script>
- Вставте код перед закриваючим тегом
</body>на вашому сайті
Копіюйте код тільки з вашого особистого кабінету — для кожного сайту генерується індивідуальний токен. Код з прикладів не спрацює!
Для багатомовних сайтів
Якщо у вас кілька мовних версій сайту, для кожної потрібен окремий код з відповідним параметром lang=:
- Українська версія:
lang=uk - Російська версія:
lang=ru - Англійська версія:
lang=en
Приклад:
<!-- Для української версії -->
<script async src="https://smartsearch.spefix.com/spefix.js?token=YOUR_TOKEN&lang=uk"></script>

<!-- Для англійської версії -->
<script async src="https://smartsearch.spefix.com/spefix.js?token=YOUR_TOKEN&lang=en"></script>
Не знаєте де вставити код або виникли помилки? Зверніться до підтримки — допоможемо з встановленням.
💬 Telegram: @spefix_pm • 📧 [email protected]
Крок 7: Налаштувати селектори кнопки
Щоб віджет відкривався при кліку на вашу кнопку пошуку, потрібно прописати селектор цієї кнопки.
Знайти селектор кнопки
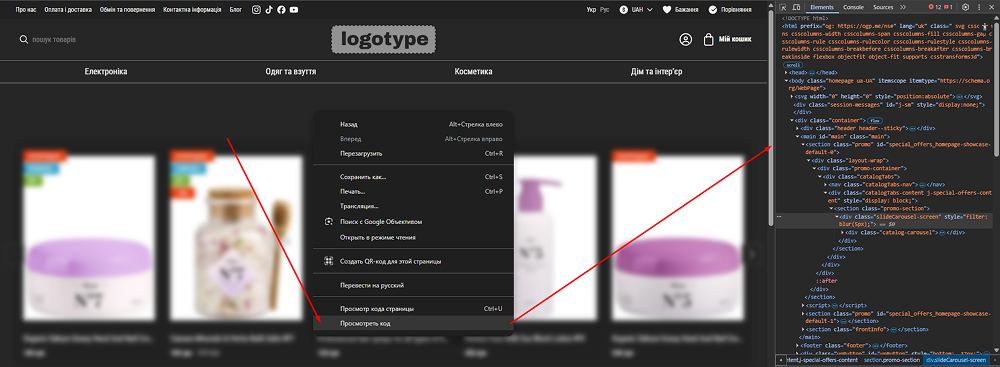
- Відкрийте ваш сайт
- Натисніть F12 (консоль розробника)
Або клікніть правою кнопкою миші → "Переглянути код"
-
Виберіть інструмент "Вибрати елемент" (стрілка в лівому верхньому куті)
-
Клікніть на кнопку пошуку на вашому сайті
-
У коді знайдіть class або id цієї кнопки
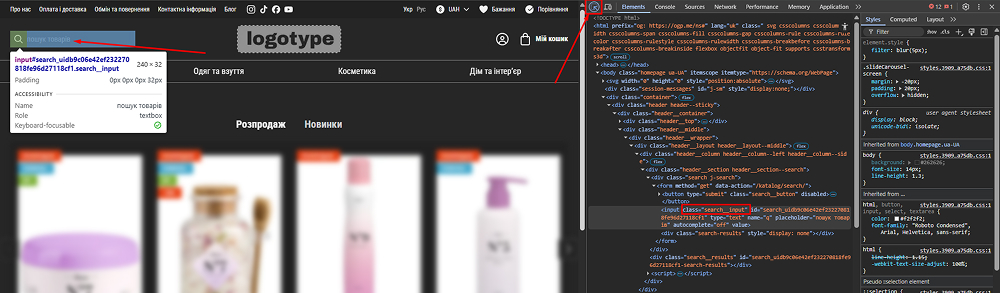
Приклади селекторів:
.search__input— клас#search-btn— ID
Додати селектор у Spefix
- Перейдіть: Налаштування пошуку → Встановлення
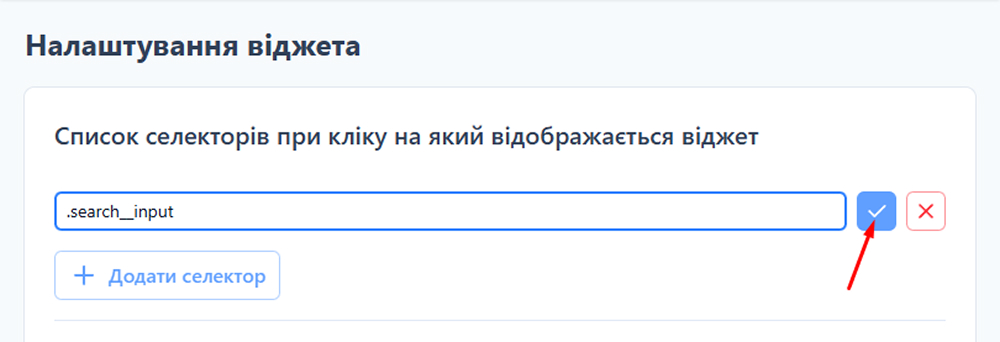
- Знайдіть блок "Список селекторів при кліку на який відображається віджет"
- Натисніть "Додати селектор"
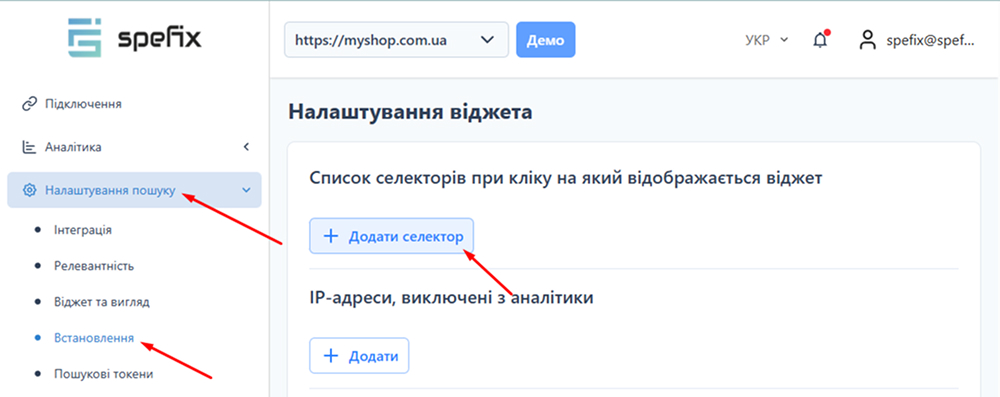
- Введіть ваш селектор (наприклад,
.search__input) - Натисніть галочку праворуч від поля (завершити редагування)
- Якщо кнопок пошуку кілька — додайте кожен селектор окремо
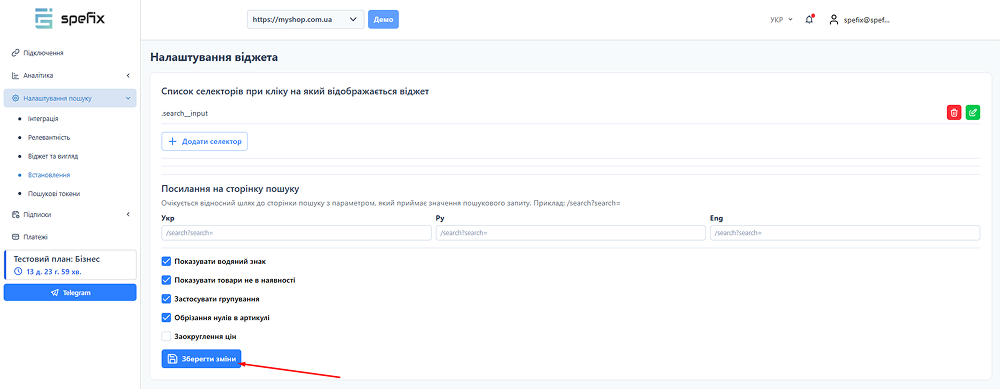
Зберегти зміни
- Прокрутіть вниз сторінки
- Натисніть "Зберегти" (кнопка з'явиться після змін)
Якщо виникли труднощі зі знаходженням або додаванням селекторів — зверніться до підтримки. Ми допоможемо знайти правильні селектори або налаштуємо їх за вас.
💬 Telegram: @spefix_pm • 📧 [email protected]
Крок 8: Перевірити роботу
-
Відкрийте сайт в анонімній вкладці (Ctrl+Shift+N / Cmd+Shift+N)
Це потрібно, щоб обійти кеш браузера -
Клікніть на кнопку пошуку → має відкритися віджет Spefix ✅
-
Спробуйте різні варіанти пошуку
Перевірте в анонімній вкладці — через кеш браузера зміни можуть не відобразитись одразу.
Якщо не допомагає — зверніться до менеджера, допоможемо налаштувати селектори.
Готово! 🎉
Spefix працює на вашому сайті.
Що далі?
- Аналітика пошуку — дивіться що шукають клієнти
- Додати синоніми — покращити релевантність
- Змінити вигляд віджету — налаштувати дизайн
Потрібна допомога?
💬 Telegram: @spefix_pm
📧 Email: [email protected]
Ваш персональний менеджер проконсультує, допоможе з налаштуваннями або підключить пошук за вас.
14 днів безкоштовно — без картки, скасувати можна будь-коли